Wednesday, June 12, 2013

Say Cheese!...Burger Pizza.

Are you fond of celebrity mash up couple names like Brangelina and Kimye? Do you find yourself often in a tizzy when choosing between two foods upon which to indulge? Are you looking for a recipe which will blow your freakin' mind next pizza night?

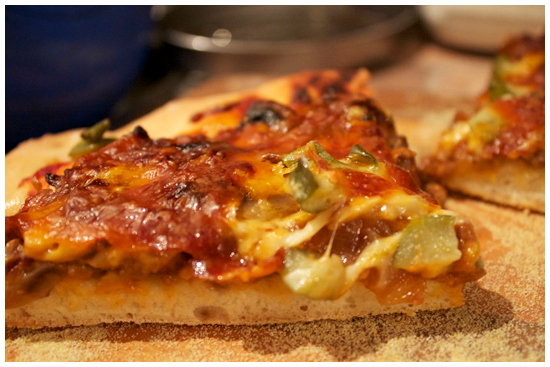
Look no further, friends. In celebration of Bite Club having 30 followers on our Facebook page (WOOHOO!), I am sharing with you one of my original recipes.

I invented this on the advent of my roommate's birthday this year. Her birthday fell on a Tuesday, which is pizza night, the most holy day of the week in our flat. I wanted to make her something awesome that still fell under the religious dietary restrictions of our pizza-for-dinner rule. (Amen.) Well, Rebekah's favourite food is burgers. Any time we go to a restaurant, it's a rare occasion indeed that she doesn't order a burger of some kind.

After searching the internet, unsatisfied with pizza recipes that seemed not burger-y enough, or involved hyper processed American cheese, I took matters into my own oven mitts and invented this. Crispy homemade crust, smothered in caramelized onion and mushrooms, ground beef sauteed in burger sauces, and topped off with two kinds of cheeses and pickles. Yes, you read that correctly. Pickles on pizza. Keep the faith. When I made it a second time, for awesome friends Josh and Reb who visited in February, the smell filling the apartment was intoxicating. As we sat around, eating the slices of heaven, even the two of us who had eaten it before would stop between bites and shake our heads in disbelief at the sheer...punch of flavour packed onto this pizza pie. 

This recipe is insanely good. It has crunch, bite, luxurious ooze, a hint of sweet from the caramelized onions, savoury from the beef and salty tang from the pickles. Not to mention, it's FUN! It's the food that childhood and stoner dreams are made of. Dude, imagine a cheeseburger had a baby with a pizza. DUDE. I MADE IT. Now, you should too.

Cheeseburger Pizza

Makes 1 pizza... the pizza of your burger loving dreams.
A Bite Club Original Recipe

Ingredients


1 recipe, basic pizza dough

2 medium cooking onions, diced
1-2 tbsp butter
8 oz. (227g) your choice of mushroom, (I used white) sliced

1/2 lb medium or lean ground beef
2-3 tbsp mustard
1/3 cup ketchup

1-3 tbsp tomato sauce
1 cup cheddar cheese, grated
1 cup mozzarella cheese, grated
2-3 dill pickles, diced

cornmeal, for sprinkling

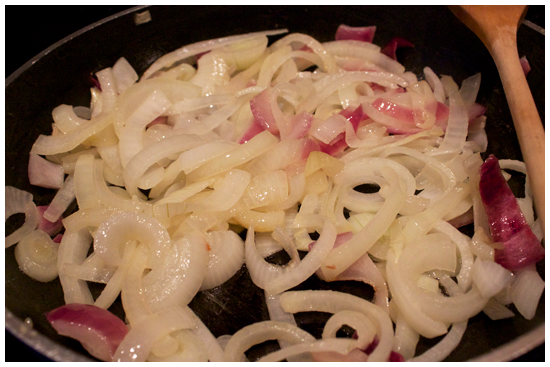
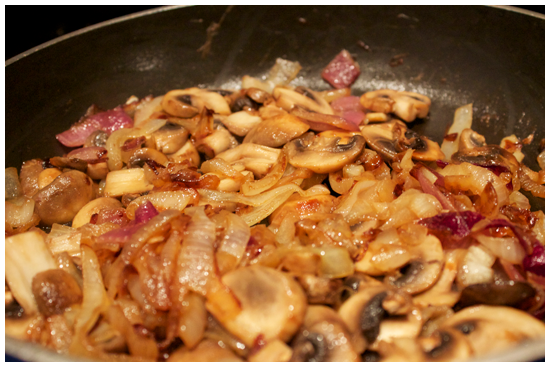
1. Cut up the onions and add to a large frying pan over medium-low heat with the butter, stirring to make sure they are evenly coated. Cook and stir occasionally to caramelize them, about 45 minutes until golden brown. (Hint: this is a good time to prepare the pizza dough, if you haven't already!) When the onions are golden, add the mushrooms into the same pan and cook until brown. Salt the mixture to taste.

2. Empty the mushrooms and onions into a small bowl and set aside. Put the ground beef into the same pan and crumble it with a wooden spoon. Cook over medium heat until just browned.  Turn off the heat and add the mustard and ketchup to the beef, stirring until it is creamy and evenly mixed. Leave to cool.

3. Preheat your oven to 425 degrees. Generously sprinkle a baking sheet with cornmeal, and roll out the dough onto it, all the way to the edges. Grate the cheeses if you haven't already.

4. Spread the dough with a thin layer of tomato sauce. Then, spread the ground beef evenly over the mixture. Follow this with the onions and mushrooms. Cover the entire thing with the grated cheeses. Over the stop, sprinkle the diced pickles.

5. Bake for 30 minutes. When it's finished, remove from the oven and let cool for an additional ten minutes. Slice, serve and live the dream.

I Am Jack's Step By Step Photos.

1. Melt butter in a medium frying pan over medium-low heat. Add the onions, stirring to ensure they are properly coated in butter.

2. After about 35 minutes. The onions will be a golden brown. Add the sliced mushrooms and cook them together, until the mushrooms are browned and slightly shrunken. Empty into a separate bowl, return the pan to the heat.

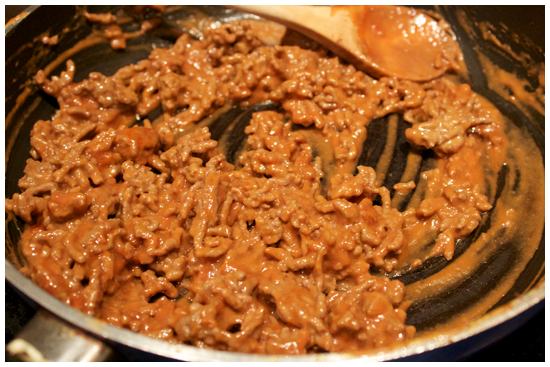
3. Add the ground beef into the same frying pan, cooking over medium heat until just browned. Do not overcook, remember, you'll be baking the pizza for another half an hour!

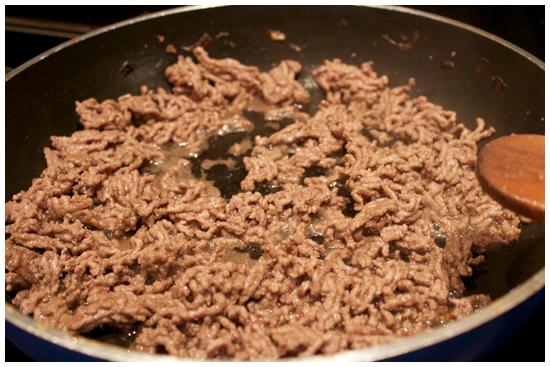
4. When the beef is cooked, turn off the heat. Stir in the ketchup and the mustard until it is evenly mixed and properly coated. Yes, it looks kind of gross. Is it delicious? ABSOLUTELY.

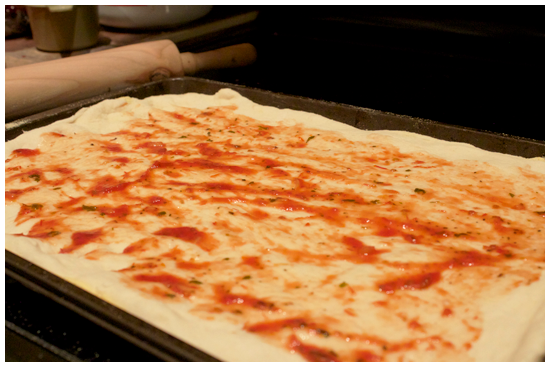
5. Preheat your oven to 425 degrees. Sprinkle a baking sheet with cornmeal generously, then roll the dough out so it meets all of the corners. Spread with a thin layer of tomato sauce, as much to your liking

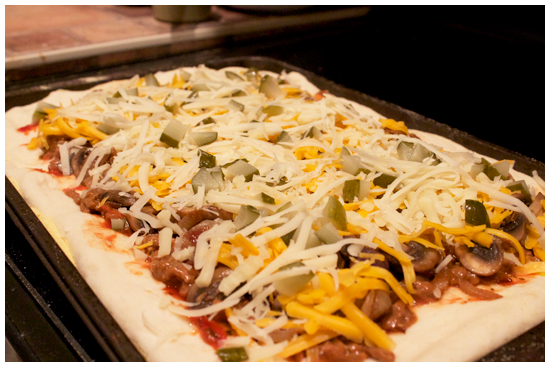
6. Spread the beef evenly over the dough, followed by the mushrooms and onions.

7. Sprinkle both cheeses over the entire pizza, and top it off with the diced pickles.

8. Bake for 30 minutes, until cheese is melted, and golden brown.

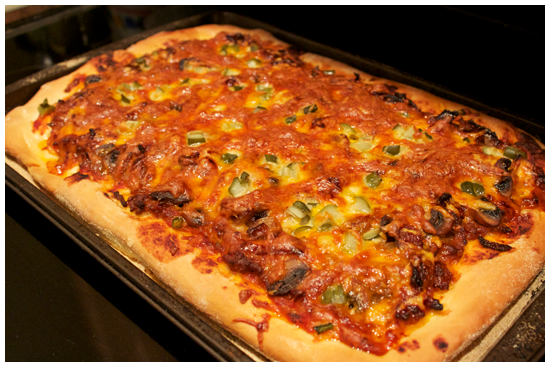
9. Allow the pizza to cool for 10 minutes. Slide it onto a wooden cutting board, slice and serve! 

Sunday, June 9, 2013

(Cara)mellow Out

I've been at war with myself. I was hit by a lightning bolt-- the idea that I could make a career out of food, specifically baking, even more specifically bread. In the past, I've written off my interest in food as a hobby. My mom once suggested I go to culinary school and I'm pretty sure I laughed at her. Food is my playtime, where I go to escape from stress, was it worth looking into as a job? Would it ruin my time in the kitchen?

But now I'm not laughing. I'm probably the opposite of laughing by having a mini quarter life crisis, or at least parallel to laughing, mooning over the romantic notion of getting up in the dead of night to go to work, bake fresh bread, handmake croissants, drink black coffee and watch the sun come up through the front window of the bakery. Sigh. The draw of hands on, hard work. Bread, sweat and tears.

While I pondering this 180 degree turn in life, I hit the library to find some books on baking, the industry, French pastry, basically any information I can get my hands on. Among them was Butter Cream, a non-fiction book by Denise Roig, a professor at Concordia (my university) who took a year off to go to pastry school and write about it.

Roig's stories about tarts and triumph, buttercream and breakdowns both pushed me towards the edge, making me pine for a world I don't know, while also putting the fear of the pastry Gods in me. The book is chock full of the trials and tribulations of not only the author, but her classmates, who several times over the course of the book all have moments of "I cannot TAKE THIS ANYMORE." She talks about the insane hours bakers and pastry chefs work, and still, I can't help but think.... Is it insane if you love it? How much do I love it? I finished the book in under a week.

The other cool thing about the book is that some of the teachers at the pastry school allowed the author to republish some of the recipes she mastered in her time there. One such recipe is today's blog: Crème Caramel. A base of lightly sweetened custard, capped off and and soaking luxuriously in a bath of caramel. So at least while I'm having thoughts about the direction of my life, I have something sweet to stew over it with. (Psst....another great thing about this dessert is that you can make it a day ahead, and it's served cool-- a nice, elegant dessert for warm summer weather.)

Crème Caramel

Makes 6 ramekins

Ingredients

1 cup sugar
1/2 cup water

2 cups milk (preferably 3.25% or 2%)
1/3 cup sugar
2 eggs
2 egg yolks
1 tsp vanilla

1. Make the caramel by combining the water and the 1 cup of sugar in a saucepan over medium heat. The mixture will start to bubble. DO NOT stir the caramel with a spoon, or the sugar will crystallize. Instead, gently swirl occasionally, brushing spare sugar back into the mix with a pastry brush coated with water.

2. The mixture will start steaming, and then when the water evaporates, it will slowly start to turn colour. Fill a heatproof bowl with cold water and ice.

3. When the caramel turns a deep amber, quickly remove the pan from the heat and plunge the bottom into the bowl of ice to stop the cooking process.

4. Quickly divide the caramel between the ramekins. If it sticks to the bottom of the pan, put it back over gentle heat to warm it up. (Pro tip: to clean pans with caramel hardened on the bottom, boil water in the pans until it dissolves back into sugar, then, pour it away!)

5. Preheat the oven to 325 degrees. Put the milk in a saucepan, over low-medium heat. In the meantime, whisk together sugar, eggs and the vanilla in a large heatproof bowl.

6. When the milk begins steaming, whisk a small amount of it into the egg mixture, doing so quickly to avoid cooking the egg. Then, whisk in the remainder of the milk.

7. Strain the mixture (in case of bits of egg) and then divide among the ramekins. Place the ramekins in an ovenproof dish, filling it halfway up with warm water. (This is sometimes called a "bain marie.")

8. Bake for 45 minutes, or until a tester in the custard emerges nearly clean. Let cool completely before refrigerating.

9. Before serving, run a thin knife around the edge of the ramekin to loosen, then turn upside down on serving plates. Voila!

I am Jack's Step By Step Photos

1. Combine sugar and water over medium heat. The mixture will start to bubble, steam and eventually change colour. Do not stir, instead, gently swirl the pan to avoid crystallizing the sugar.

2. When the sugar mixture turns amber, plunge the bottom of the pot into a waiting bowl of ice water to stop the cooking process.

3. Pour the caramel into the six ramekins. While it's cooking, prepare the custard. (Scroll down!)

 4. Preheat the oven to 325 degrees. Heat the milk on the stove until it starts steaming. In a separate bowl whisk together sugar, vanilla, eggs and egg yolks. Add the hot milk to the egg mixture, streaming it in while whisking vigorously to avoid clumps of cooked egg.

5. Strain the mixture once, then divide it among the six ramekins. Place the ramekins in a deep ovenproof dish, and fill it halfway up with warm water.

6. Bake for 45 minutes, until a knife inserted comes out mostly clean. Then, let cool completely before setting them in the fridge.

7. Come serving time, run a thin knife around the edge of the ramekin to loosen it. Invert on a serving plate, garnish and serve!

Sunday, June 2, 2013

Puffed Up Kicks

Wow wow wow wow! The blog has hit some pretty exciting milestones lately! Including over 2000 pageviews, and a solid 30 followers on Facebook. As promised, I'll be posting my Cheeseburger Pizza recipe soon as I can! I'm pumped to share it with all of you. But forget, dinner, let's talk dessert. (Again.)

There are all sorts of rules and guidelines to life. My parents taught me to never show up to an invitation empty handed. A common rule of thumb is that you should never try out a brand new recipe when you're serving it to other people. I have a belief that if I'm going to spend money on ingredients, I want to put that money to good use by trying something I've never done before. I want to push the limits of my knowledge and my skills, and I admit, be the one who shows up to the pot luck with the dish that's a touch more elaborate than the rest. It comes with the territory of being competitive. ANYWAY.

As you might guess, my philosophy sort of thumbs its nose at the first rule in the wrong situation, and completely stomps on the toes of the second. If you try a new recipe and it goes wrong, you're the one showing up with the store bought two bite brownies. Delicious, but don't get me wrong, not spectacular.

Know what's spectacular? Cream puffs. Baked up to puffy, crispy heights and sandwiched around smooth, sweet whipped cream, nuanced with light bite and warm milky flavour of shredded coconut. Although it was only my second crack ever at making choux pastry, I threw caution to the wind and whipped up these babies to bring to lunch with my two friends, Sarah and Hannah. They're light and summery and they make a great first impression. The cream puffs were delicious too.

Giant Coconut Cream Puffs

Makes 8 Puffs 
Recipe adapted from Sticky, Chewy, Messy, Gooey by Jill O'Connor

Ingredients


1 cup water
1/2 cup unsalted butter
1/2 tsp salt
2 tbsp sugar
1 1/4 cups all purpose flour, sifted and THEN measured
4-5 large eggs, beaten
1 egg + 1 tbsp water for eggwash
1/2 cup shredded coconut

1 1/2 cups heavy cream, cold
1/2 cup icing sugar
1 cup shredded coconut (sweetened or unsweetened, to your own taste)

1. Move a rack to the bottom of the oven and preheat to 400 degrees. Line a baking sheet with parchment paper.

2. In a non-reactive pan (confused? I was too, click the link and read on!) combine water, butter, salt, sugar. Stir occasionally until the butter melts completely. AFTER the butter has melted, increase the heat and bring the mix to a rolling boil.

3. Remove from heat and add the flour all at once, stirring vigorously with a wooden spoon until it comes away from the pan and clumps around the spoon. Then, return the pan to medium heat stirring briskly for 1 minute, to cook the flour and dry out excess moisture in the dough.

4. Turn your dough out onto a piece of aluminium foil lining your counter top and let it cool for 5 minutes. (You don't want the eggs to begin cooking too soon, or your texture will be off!)

5.  Return the dough to the pan, begin adding the beaten eggs, 1/4 of the mixture at a time.  The mixture will be very slippery at first, so stir slowly to keep it all in the pan. When it becomes more incorporated, stir more quickly until it smooths out. Add the remaining eggs, repeating the process for each 1/4 added. The result should be a slightly sticky, smooth, malleable batter that holds peaks. (If the batter is too firm, beat the 5th egg, and add it 1 tbsp at a time until the consistency is reached.)

6. Divide the batter into 8 parts and scoop onto the prepared baking sheet 2-3 inches apart. Brush with egg wash and sprinkle each with a tablespoon of shredded coconut.

7. Bake for 20-25 minutes, until the puffs are golden brown and puffy. Reduce your oven to 350 and bake for 15 minutes more to make sure the pastry is crisp inside. Transfer to a wire rack to cool.

8. With a serrated knife, cut the puffs in half horizontally to release any steam in them. Place the puffs back on the baking sheet and return to the oven for 3-5 minutes to ensure they dry. Remove from the oven and cool completely.

9. Make the filling by whipping the cream and sugar with a chilled bowl with chilled beaters until stiff peaks form. Fold in the shredded coconut gently with a spatula.

10. Fill a pastry bag (or ziplock) bag with the whipped cream and pipe it onto the bottom half of each puff, generously. (You can also just spoon it on, if you're feeling low maintenance.) Place the top half gently on top of the cream (like a coconut chapeau). Serve!

I Am Jack's Step By Step Photos


1. Line a baking sheet with parchment, and preheat the oven to 400 degrees. Combine water, butter, sugar, salt in a non-reactive pan. Let the butter melt, before bringing it to a rolling boil.

2. Remove the pan from heat and add all the flour, vigorously stirring until the mixture clumps around the spoon. Return to medium heat, stirring for 1 minute to dry out any excess moisture.

3.  Let the mixture cool on a foil sheet on your counter for 5 minutes to avoid cooking the eggs when you begin to add them.

4. Stir in the beaten eggs, 1/4 at a time. Stir slow at first to avoid making the batter slop, and then quicker until it smooths out before the next addition. The finished batter should be a little sticky, malleable and able to hold peaks.

5. Divide the batter into 8 and scoop onto the prepared baking sheet. Brush lightly with egg wash and sprinkle with coconut. (Do a nicer job of shaping them than me, that's one of the things I'd tweak next time!)

6. Bake the puffs until golden brown and expanded, 20-25 minutes. Reduce the oven to 350 and bake for  15 minutes more to dry them out. Remove from the oven and set on a wire rack to cool slightly.

7. When the puffs are cool enough to the touch, gently cut them in half horizontally with a serrated knife to release steam. Put the cut puffs back on the baking sheet, and back into the oven for 3-5 minutes. Remove from heat, place on racks and let them cool completely. 

8. Whip together the sugar and heavy cream, then fold in the shredded coconut. (I totally forgot to take pictures of this step, but I know you're ready and willing to give it a go! Pipe onto the bottom half of the puffs and cap them off with the top half. Serve!